

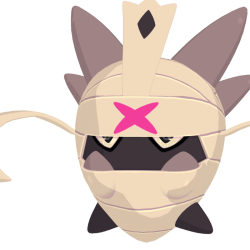

Venx
-#154
 Neutral
Base Stats
BIO
| Height | 160cm / 62" |
| Weight | 80kg / 176lbs |
| Catch rate | 100 |
| Hatch time | 25min |
| Weight | 80kg / 176lbs |
| Gender distribution |
50%
|
| TV Yield |
atk
+2
spdef
+2
|
Tempedia
This cute little warrior is popular among young tamers, who love to customize their own with bandages of different colors and patterns. Some Dojos are enforcing a more formal white-bandage code for serious competition.
Defensive Matchup
|
|
|
|
|
|
|
|
|
|
|
|
|
|---|---|---|---|---|---|---|---|---|---|---|---|
| x1 | x1 | x1 | x1 | x1 | x1 | x2 | x1 | x1 | x1 | x1 | x1 |


Evolutions


Traits
Locations
| Island | Arbury |
| Route | Sewers of Properton |
| Rarity | 20% |
| Level | 50 - 60 |
| Pansun | 155 - 182 |
Techniques
Learned by Levelling
Scratch
Almost any claw or nail can scratch the surface. Sometimes that's enough.
 Neutral
 Physical
Heavy Blow
Effective and unsubtle, like a Tucmani mine drill.
Neutral
Physical
Strangle
Strangler and strangled, united in a deadly embrace. Both attacker and target get overextended next turn.
 Neutral
Physical
Neutral
Physical
Shelter
Take cover! This slow technique gives DEF and SPDEF at the expense of leaving you Overexerted on the next turn.
 Neutral
 Status
Head Ram
Use your head, non-metaphorically.
Neutral
Physical
Savage Suplex
In classic Temtem wresting showbiz style, this Neutral technique damages and exhausts the target for 2 turns.
Neutral
Physical
Late Torment
The first cut is the deepest, but the last one hurts like Downbelow. This Neutral Technique only works on trapped enemies and inflicts 180 damage.
Neutral
Physical
Sacrifice
A Temtem may pay the ultimate price to heal the target of all Status conditions and give them DEF and SPDEF .
 Neutral
Status
Neutral
Status
Unseen Blow
Nothing hurts like the blow you didn't see coming! This technique inflicts heavy damage.
Neutral
 Special
Learned by TechniqueCourses
Base Jump
It's not the jump that hurts, it's the landing - and it hurts the target A LOT.
Neutral
Physical
Brace
Survival is often the greatest of victories. Only effective if the Temtem is already alerted; removes it, gives evading for 2 turns and heals 10%.
Neutral
Status
Untangle
With a few swift movement, this techniques Untraps the target from any tangle. If trapped is removed successfully, the target gets DEF and SPDEF .
 Neutral
Status
Neutral
Status
Learned by Breeding
Ninja Jutsu
The secret arts of the Cipanku shinobi! This technique lets you backstab enemies in the blink of an eye.
 Neutral
Physical
Neutral
Physical